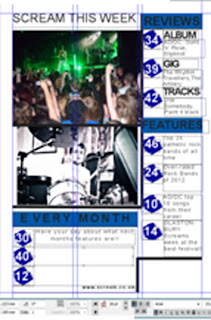
I added my two pictures and the titles for each part of the contents page and started to number the pages. I then added the blue box by using the graphic tool, then i added the text using the text tool.
I made the 'scribbles' on the back ground for the numbers on my contents page on photo shop by using the paint brush tool and literally making a scribble. I then went on to add the text for my contents page and the numbers by using the text tool. I also added a black box in the corner and put black lines around the pictures using the Quark graphic tool.
I then took the black lines of using the undo tool. I then changed the title of SCREAM to match my front cover, and added numbers to the pictures in white and big to make them stand out. And took the black lines off because it didnt look good. Then I added more text to the every month so the columns stayed in place.
I changed the second picture because it was very similar to my double page spread picture.
 I then changed the title 'Scream' abit smaller because I wanted to make the 'inside this week' bigger so it stands out. I then added a lot more coverlines using the text tool because it was too bland otherwise and had a lot of space to fill.
 Then I changed the Scream title to the same one on my contents page. I done this by print screening the title then turning into in a JPEG on photo shop then I inserted into my quark project on my contents page using the picture tool.
 I moved all the text to the righthand side to make room for an extra picture using the moving tool on Quark. I also used the text tool to change week to month because my magazine it monthly. I used the picture tool to add a new picture onto my contents page.
Quark was the best software to use to make my contents page.


No comments:
Post a Comment